Leveraging System Families for Simple Facades
In this module, we’ll build our first Revit-driven facade using system families (curtain walls and basic walls) driven from Grasshopper via Rhino.Inside.
This approach is best suited for buildings where:
- Facades are vertical (not leaning in or out), and
- They are either straight in plan or curved in plan, but not twisting as they rise.
More complex conditions (twisting towers, leaning facades, or non-vertical panels) will be handled later with adaptive families and direct shapes.
We’re going to:
- Re-use our attributed slabs and floor-to-floor data from earlier modules
- Clean up slab edge curves so Revit reads them as pure lines and arcs
- Rebuild slabs so they close gaps at the top and bottom of the facade
- Use those cleaned curves to drive Revit floors and curtain walls via Rhino.Inside
1. Starting a Fresh “Facade Definition”
We’re intentionally not building facades inside the structural or massing definitions. Instead, we’re treating this as a new function dedicated solely to facades, and re-using previously baked, attributed geometry.
-
Start a new Grasshopper definition in the same Rhino file.
-
Drop a
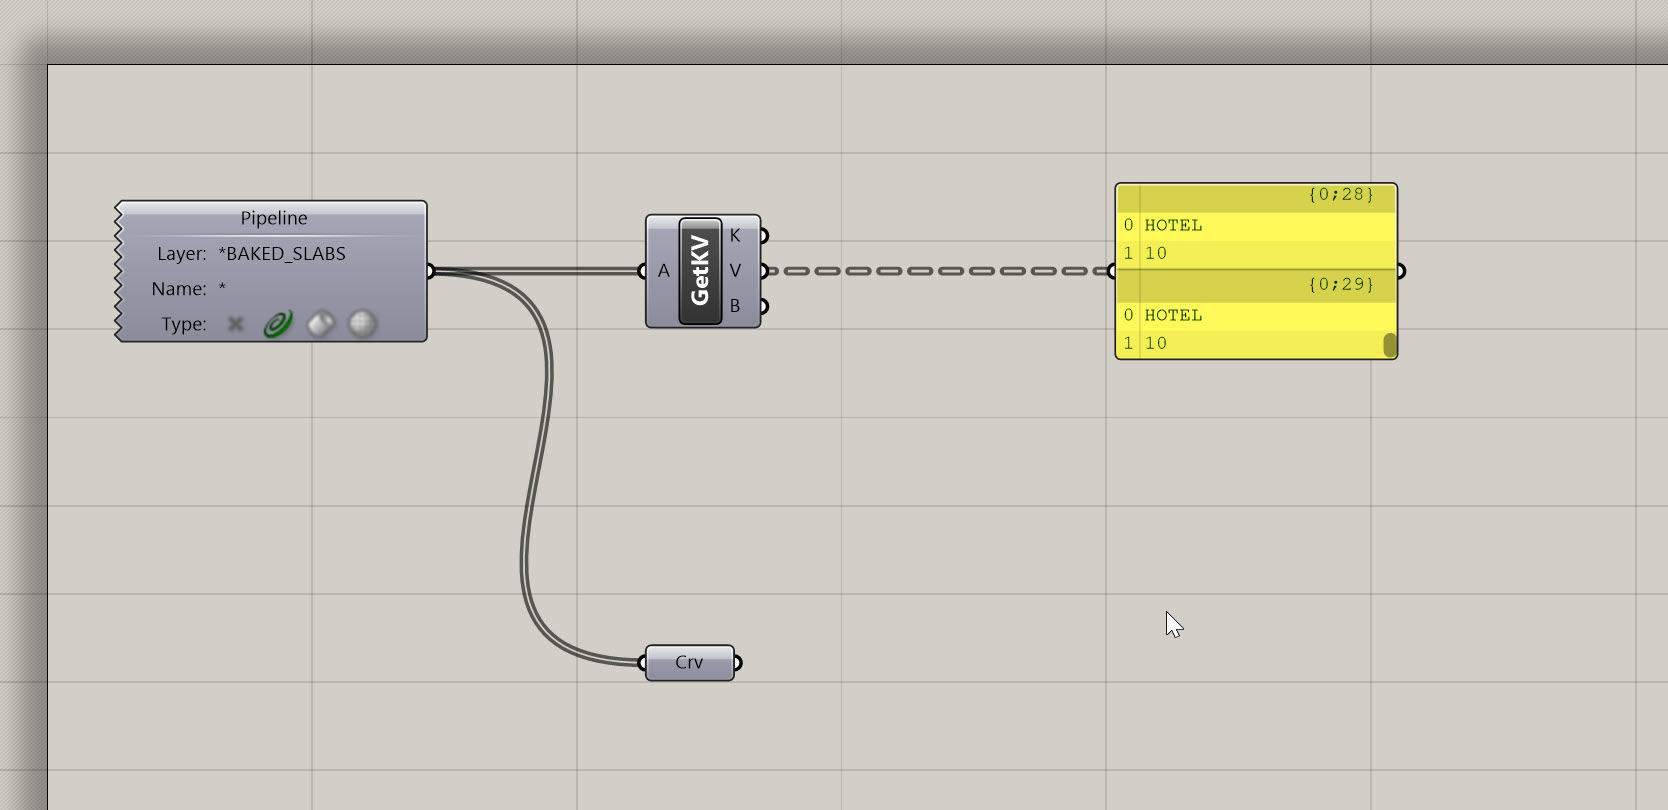
Geometry Pipeline (Pipeline)to pull in your attributed floor slabs (curves or slabs) on the appropriate layer. -
Use
GetKVfrom Elefront to retrieve:- Program
- Floor-to-floor height
for each slab.
-
Confirm you have:
- A list/tree of slab edge curves
- A list/tree of associated heights and programs
Conceptually, this definition is your “Facade System Families” function, sitting alongside your:
- Massing + program extraction
- Structural system
- Compliance/targets
2. Geometry Strategy Before Facade Strategy
Before we draw a single wall, we need to make a big decision:
Are we treating this tower as a vertical system facade or as a twisting / leaning facade?
In this module, we’re assuming:
- All facades are vertical,
- They can be curved in plan,
- But they do not twist as they rise.
That choice changes how we build our slabs:
- For a twisting tower, you might let each slab follow the twist and let the facade “lag” or cut through.
- For a vertical curtain wall, the slabs need to “close the gaps” at top and bottom so that the vertical glass still works as you move up the building.
We’re going to rebuild our slab curves specifically for this vertical system-facade scenario.
Joe’s Tip
Always decide on your facade strategy before you invest in geometry. Twisting mass + vertical glass ≠ same slab logic as twisting mass + twisting glass. If you don’t decide early, you’ll end up rebuilding a lot of geometry later.

3. Cleaning Up Slab Edge Curves (Lines + Pure Arcs Only)
Revit’s wall-by-curve components are happier when the input curves are pure lines and arcs, not messy “referenced planar curves” or polycurves. This step is all about curve hygiene.
3.1 Explode the Slab Boundaries
- Start from your floor slab boundary curves (one closed curve per floor).
- Use
Explodeon those curves. - Inspect the output with a
Panel:- You’ll see a mix of “line-like curves” and “referenced planar curves” (almost arcs, but not quite).
We want to keep the true lines, and rebuild everything else as true arcs.
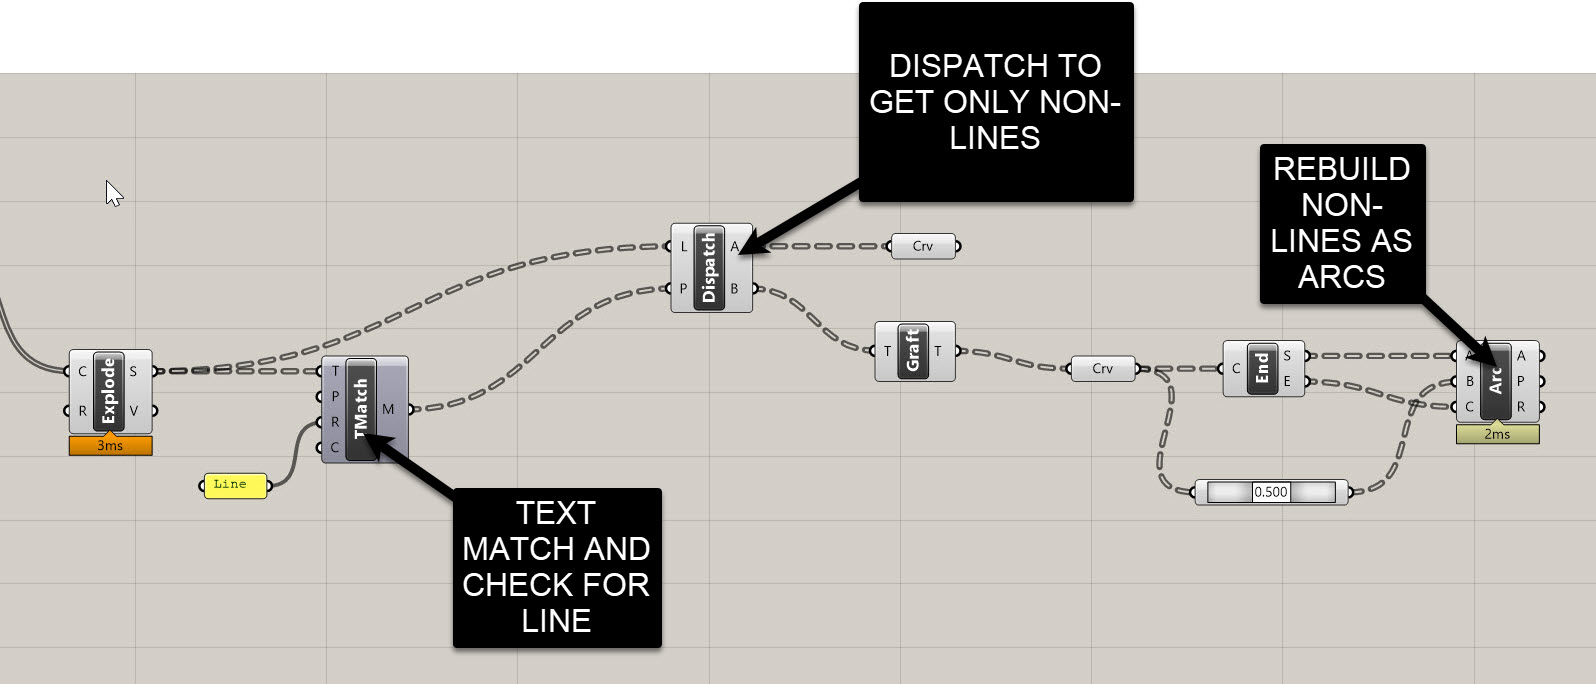
3.2 Classify Segments with Text Match + Dispatch
Grasshopper labels the segment types as text, so we can use that to sort them:
- Add a
Text Matchcomponent (Sets > Text > Match Text). - Plug the exploded curves into the T input.
- In the R (regex) input, type:
line - The
Moutput gives you a True/False pattern:True= line segmentFalse= planar curve needing rebuild
- Use a
Dispatch:A→ linesB→ curves to rebuild
3.3 Rebuild Planar Segments as Arcs
For segments in B:
Graftthe curves.- Use
End Points(start + end). - Use
Point On Curve(t = 0.5) for midpoints. - Build a
Arc 3Pt:- Start
- Mid
- End
Result:
A clean set of true arcs that perfectly replace all the “almost planar” curves.
3.4 Reassemble Per-Floor Closed Curves
Mergethe line and arc segments.- Use
Shift Pathsto group them back into one branch per floor. - Use
Join Curvesto create a clean closed boundary per slab.
4. Rebuilding Slabs to Close Facade Gaps
Now we’ll fix the top/bottom gaps so a vertical curtain wall can work correctly.
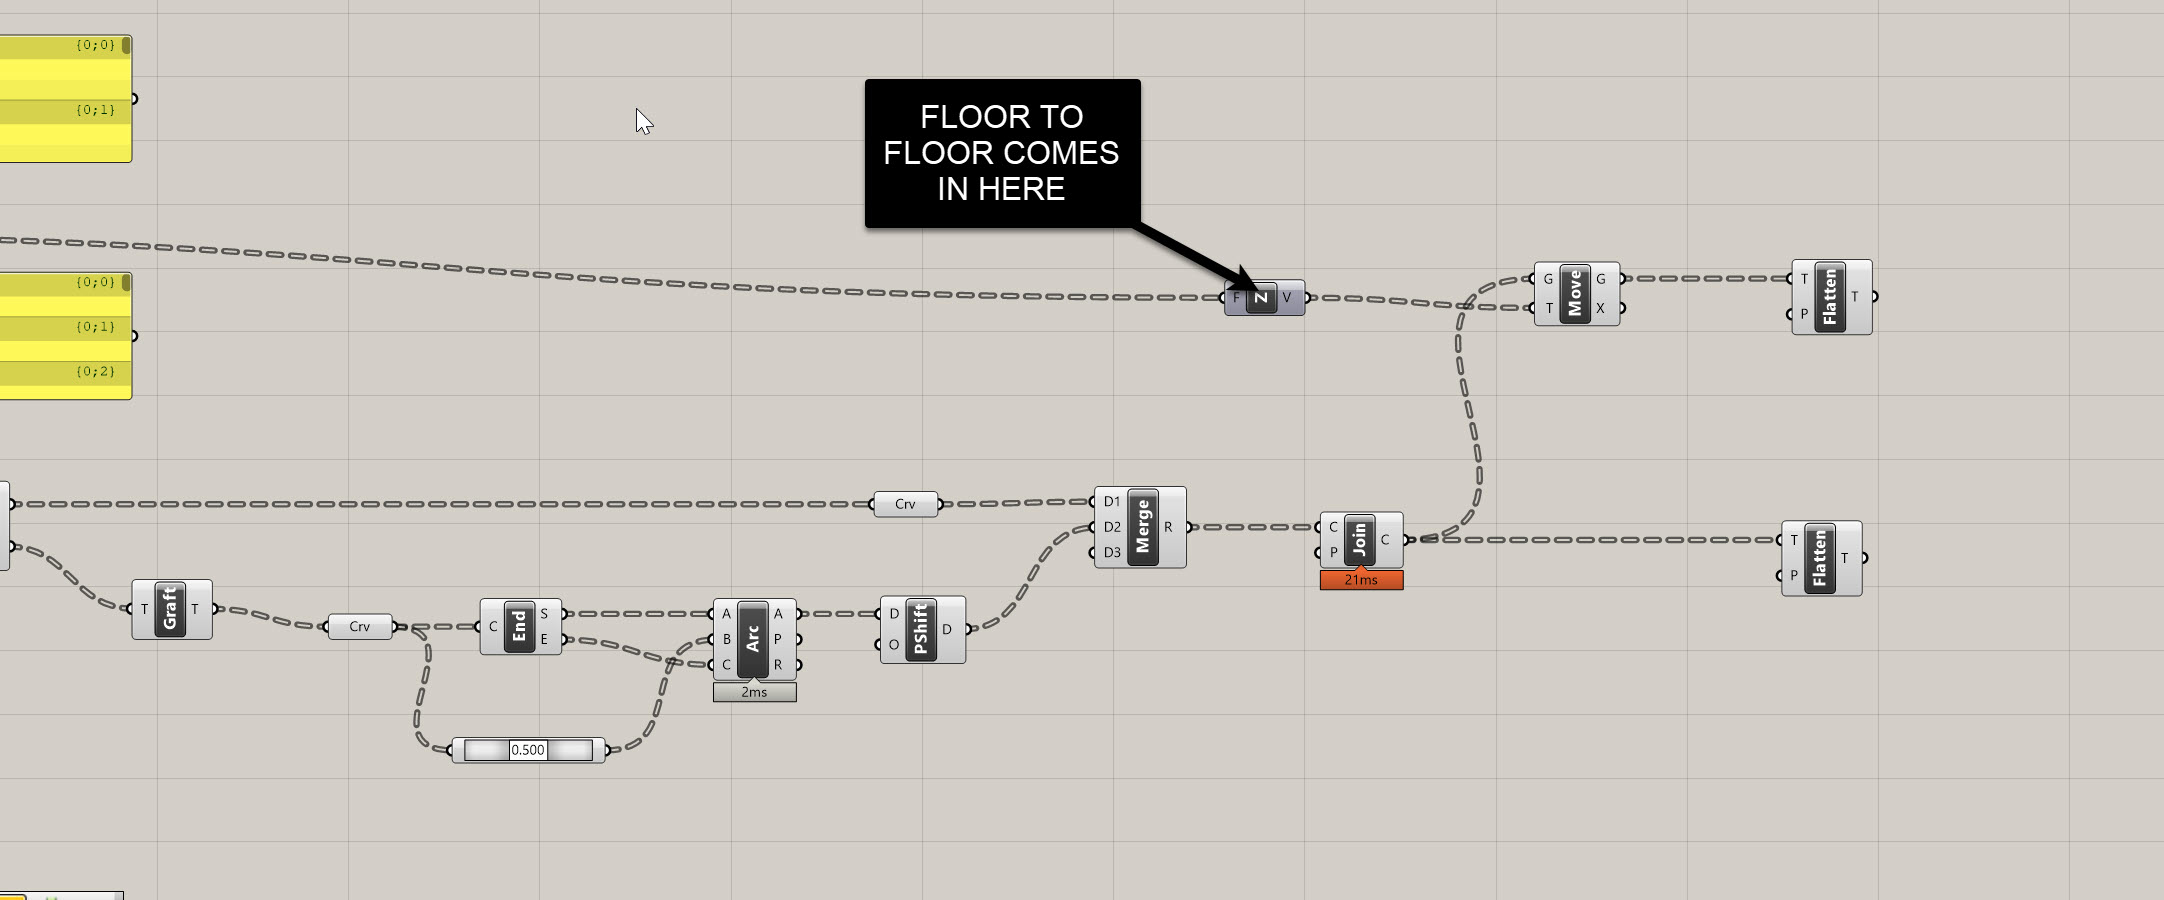
4.1 Move Curves Up by Floor-to-Floor Heights
- Get floor-to-floor heights from your attributed data.
- Flatten or graft so curves and heights align.
- Move curves upward using
Movewith a Z vector multiplied by height.
Now you have:
- Original curves
- Curves shifted up one level
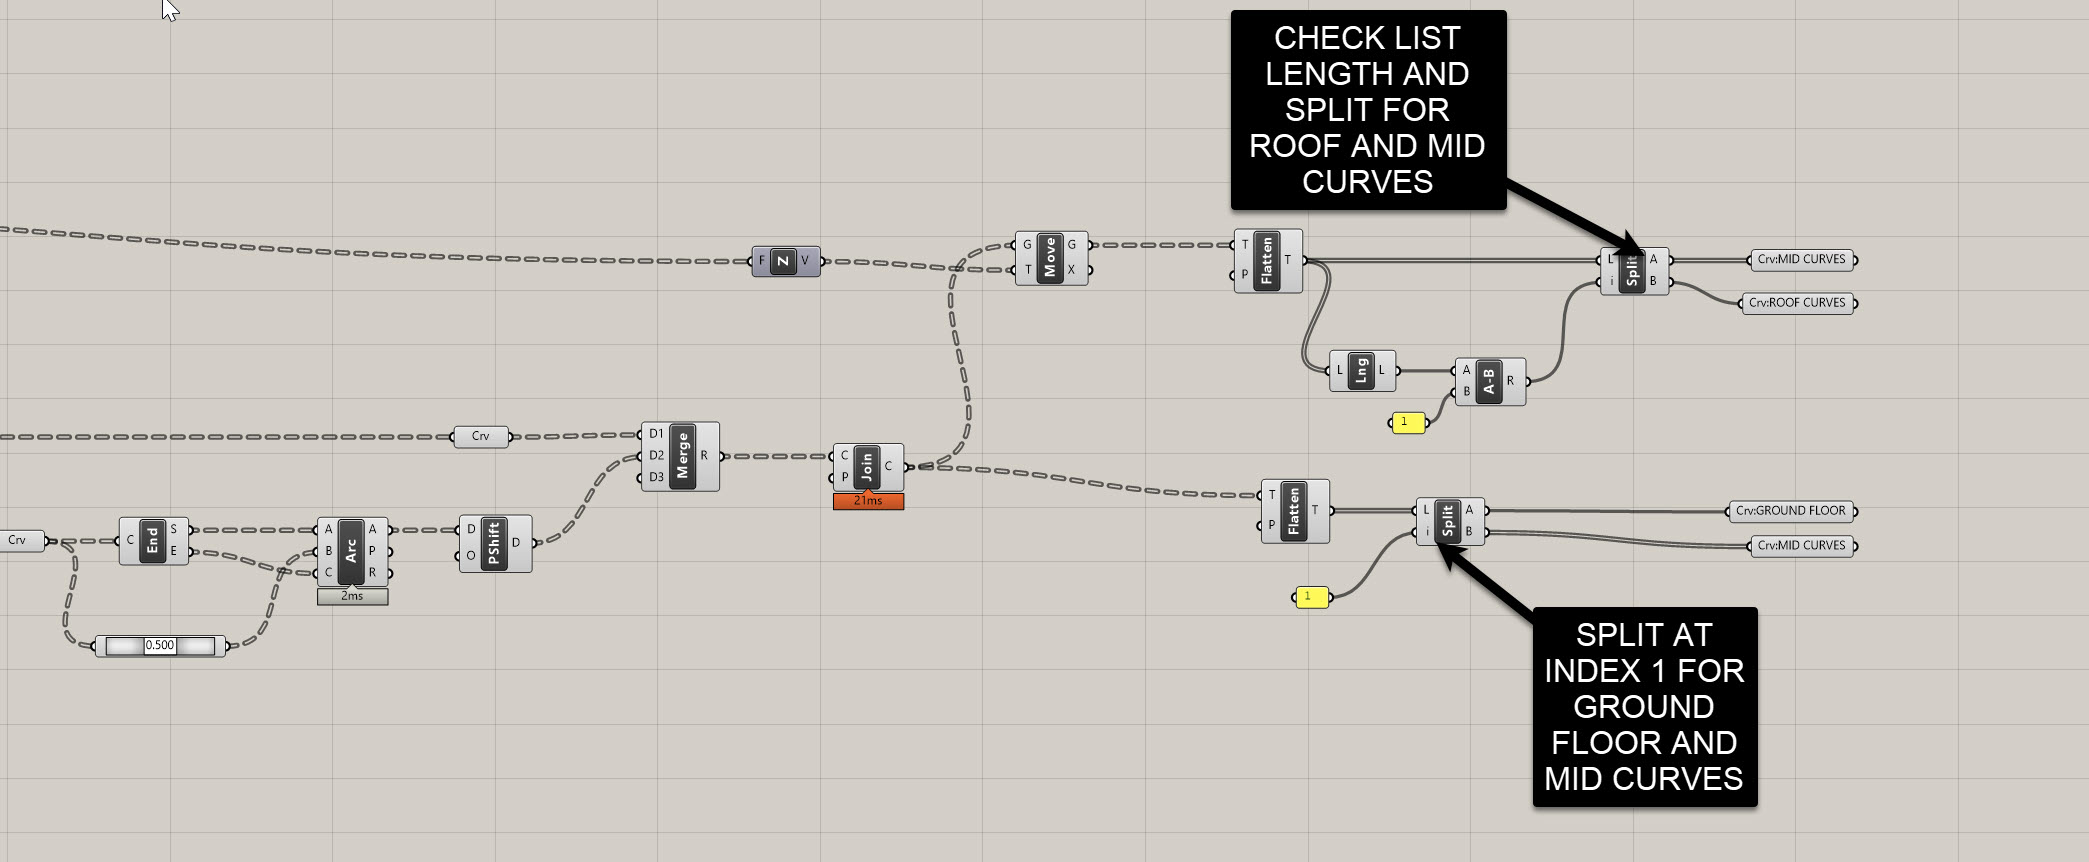
4.2 Isolate Ground, Middle, and Roof Curves
Original curves:
- Split List at index 1
- First → ground floor
- Second → mid + roof
Shifted curves:
- Compute list length → subtract 1 → split
- First → mid shifted
- Second → roof
4.3 Region Union for Mid Slabs
We union lower/upper curves to remove gaps:
Graftmid curves.Mergelower + upper curves per floor.- If region union errors occur, project curves onto XY planes created at each curve centroid:
Area→ centroidConstruct PlaneProject
Result: Perfectly planar outlines for each mid slab.

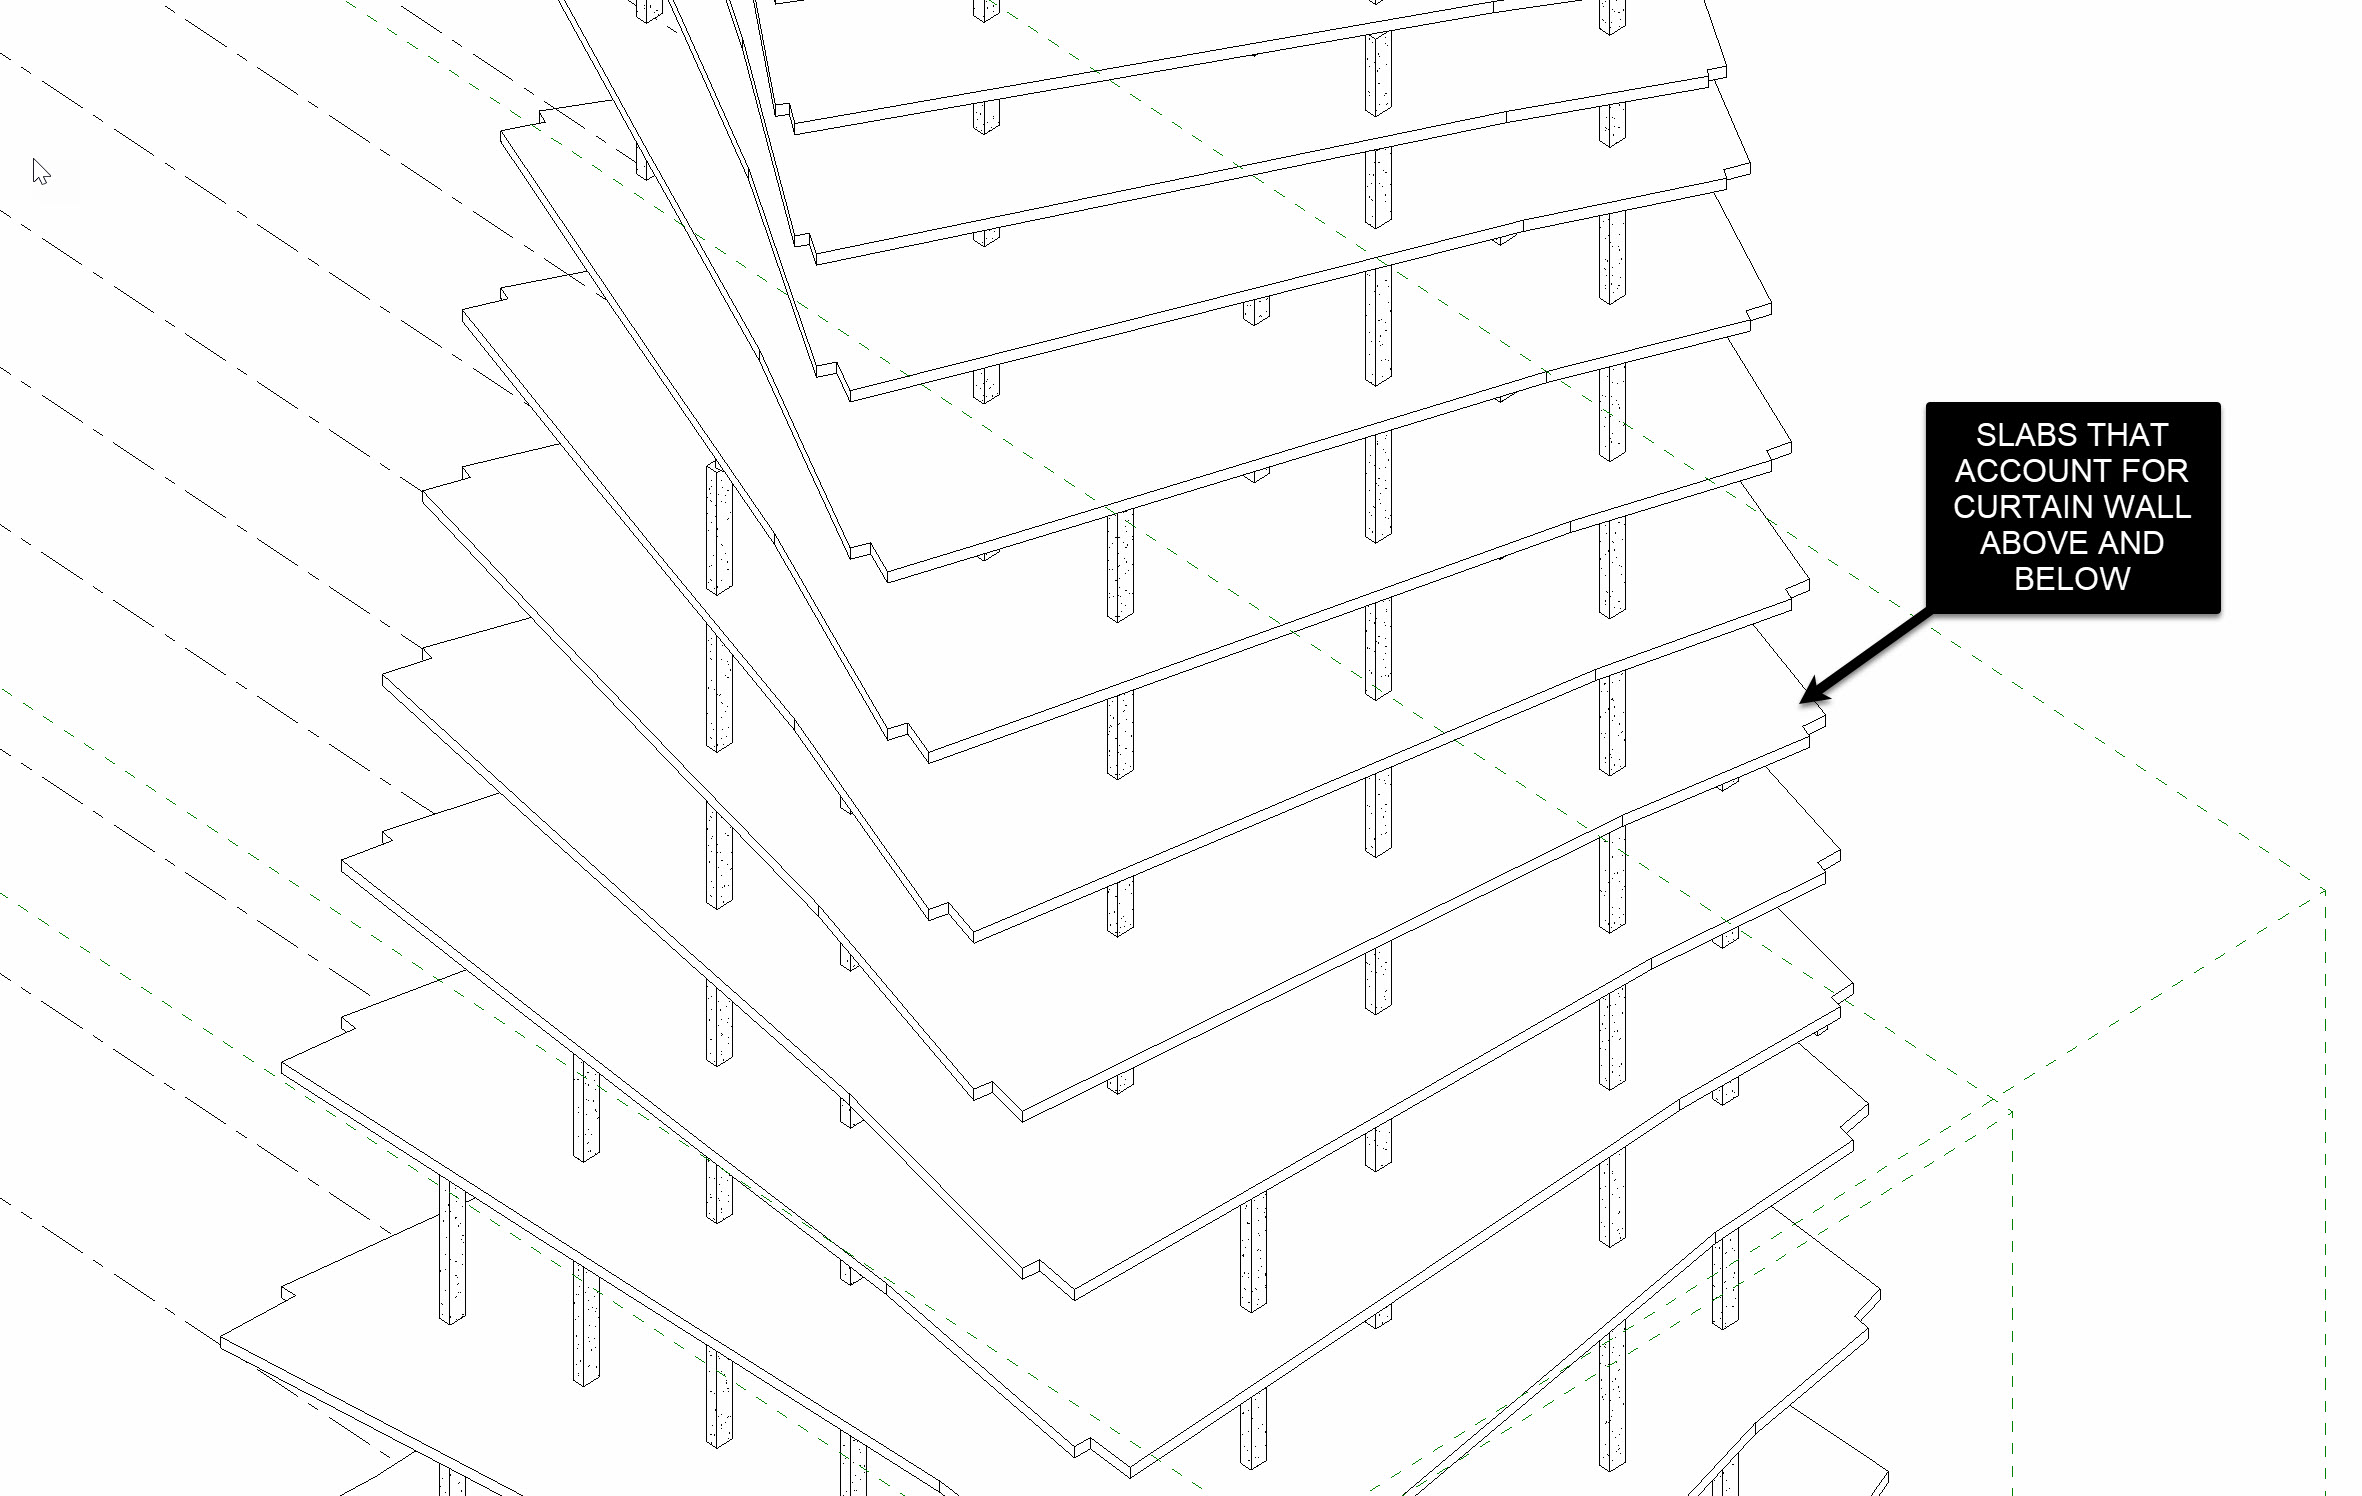
4.4 Use Region Unions as New Slab Boundaries
In Revit:
- Delete all existing slabs (select all instances → unpin → delete).
In Rhino.Inside:
- Use
Add Floor. - Feed region union curves as boundaries.
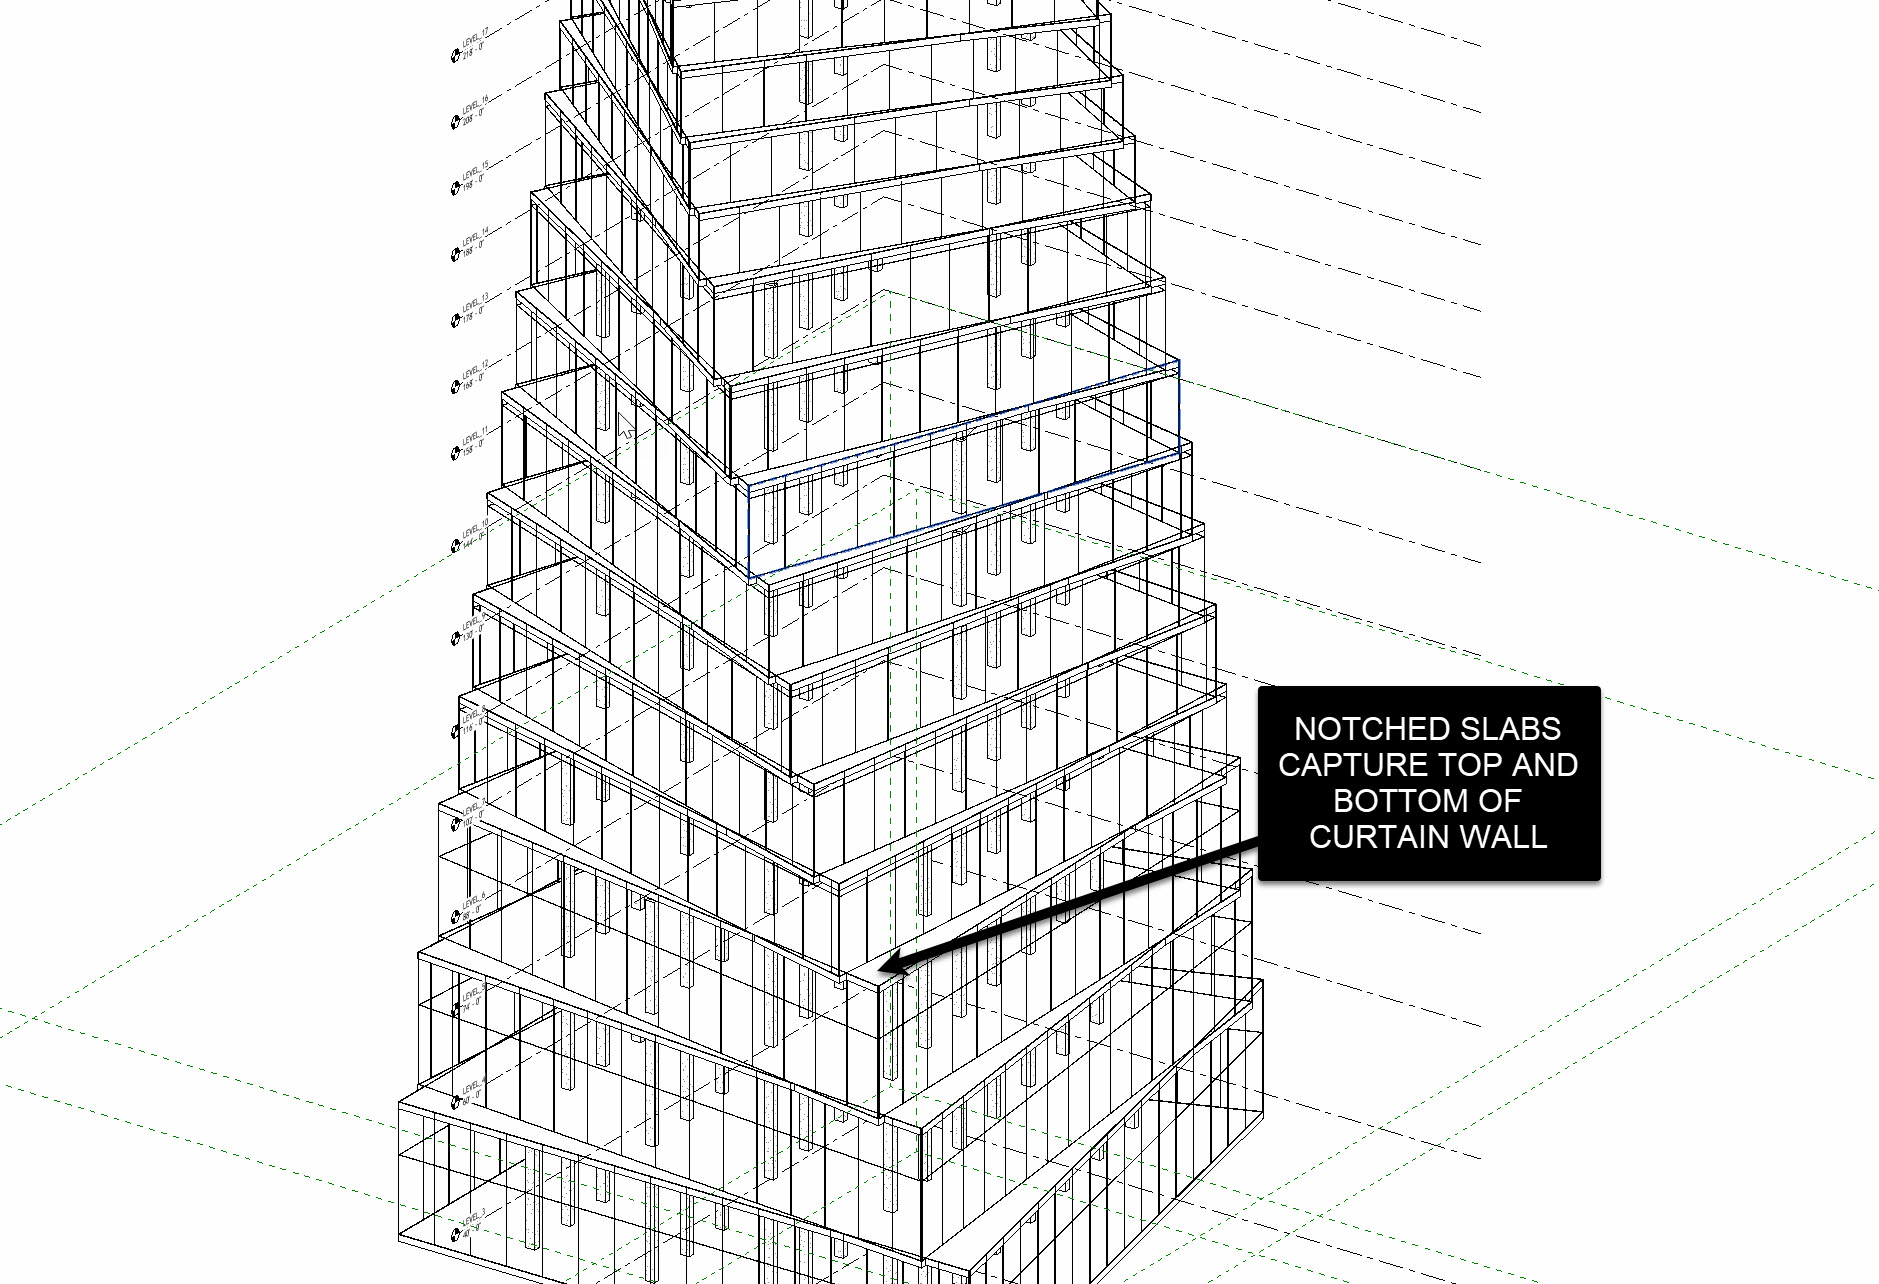
You should now see notched slabs that cleanly close the facade.
Important:
- Use region union curves for slabs.
- Use cleaned curves (lines + arcs) for walls.
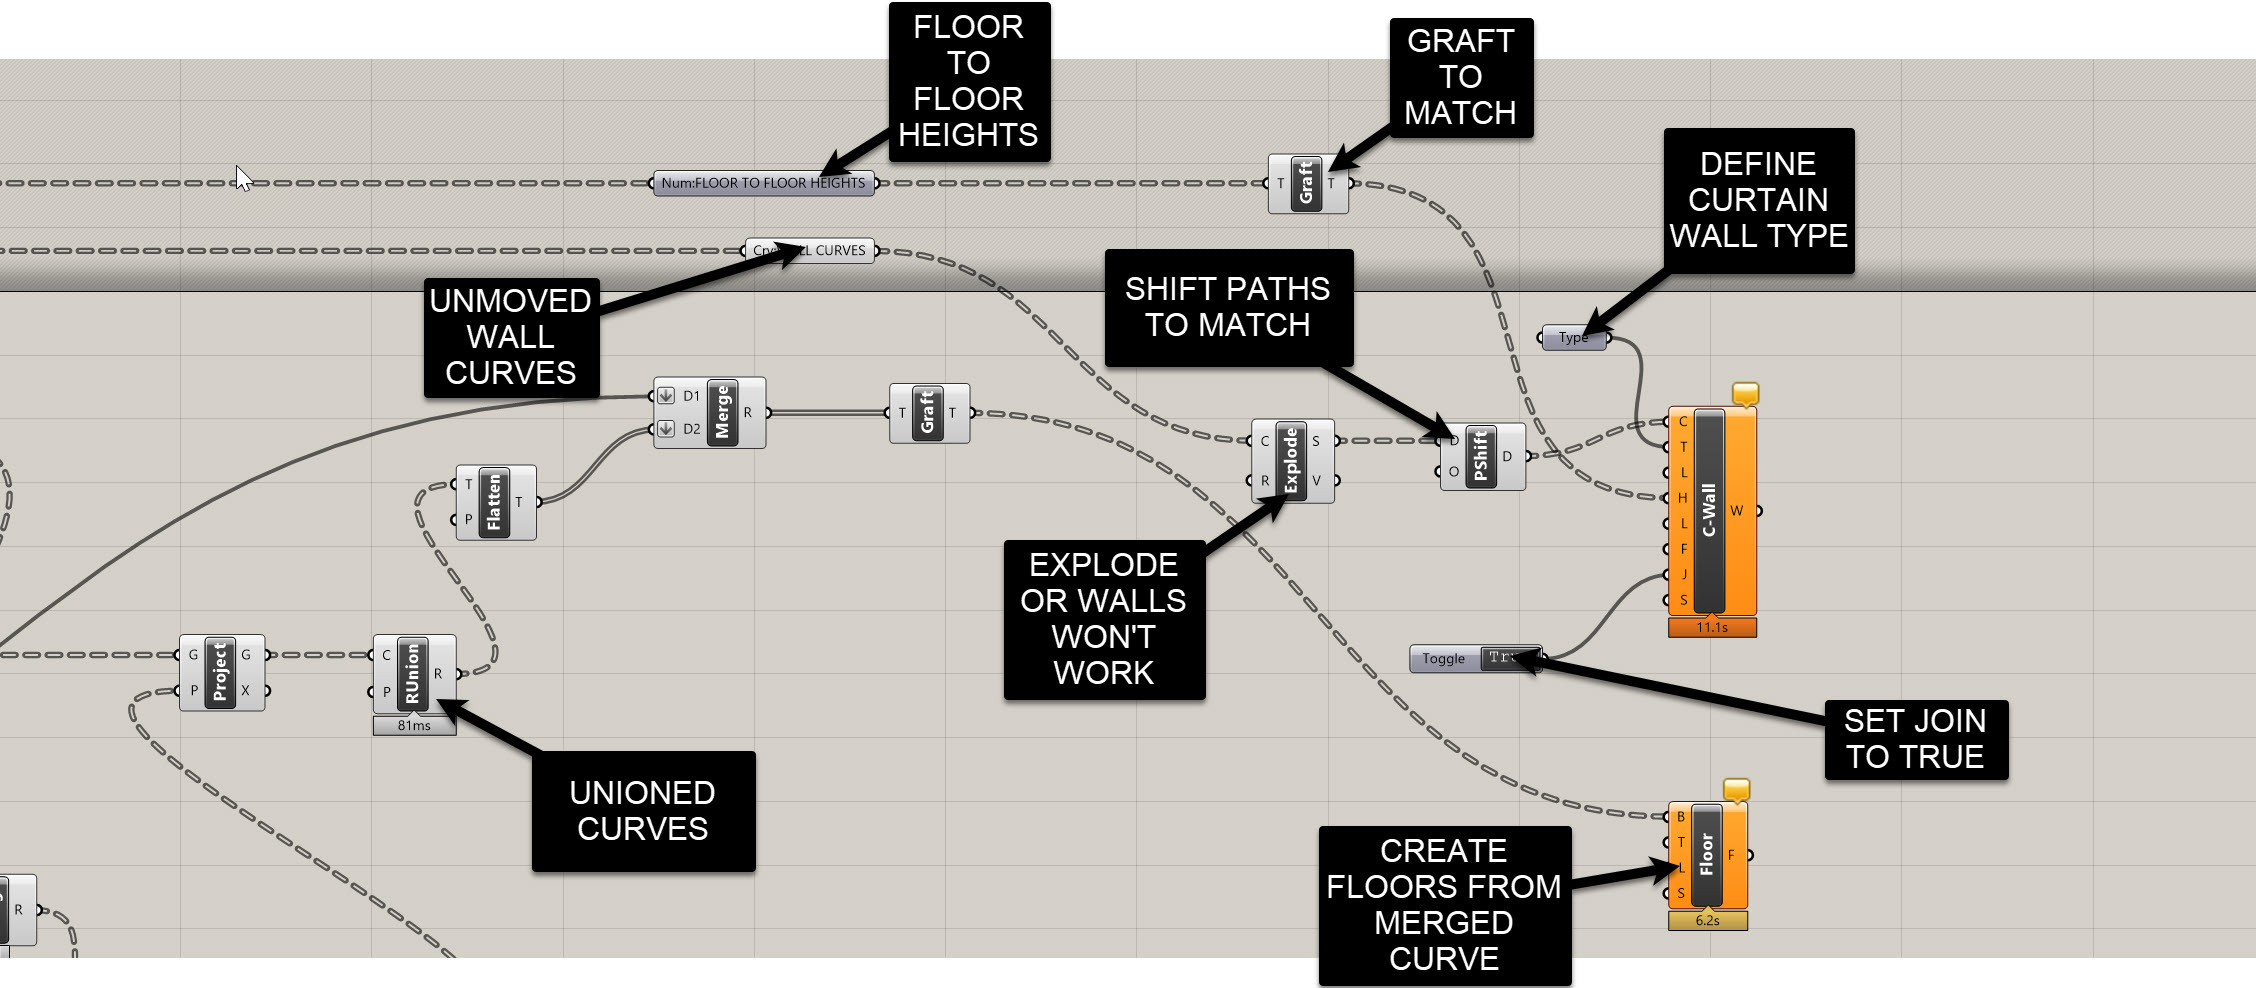
5. Building System-Family Curtain Walls from Clean Curves
5.1 Set the Wall Type
Choose Exterior Glazing (or your own system) in Revit.
5.2 Feed Curves Into the Wall Component
The wall-by-curve component requires segments, not closed curves.
Explodeyour cleaned slab edges again.- Plug segments into
Curveinput. - Turn Allow Joins = True to let Revit join walls internally.
5.3 Set Heights From Floor-to-Floor Data
Graftheight values to match curve structure.- Plug into
Height.
5.4 Tracking Mode: Enabled Replace
Always use:
Tracking Mode: Enabled Replace
(Deletes + recreates elements each solve)
Much safer during early design when element counts change.
6. Using the Right Curves for the Right Job
Summary:
- Region union curves → slabs
- Cleaned line/arc curves → walls
- Exploded curves → wall-by-curve
- Joined curves → never used directly for walls
You can download the final working file here: https://drive.google.com/file/d/1O4hkWXVs-PbYg87efCzgZhXoIT2Mk9aT/view?usp=sharing
Side Challenge: Controlling the Slab–Facade Relationship
Try adjusting:
- Base offset
- Top offset
- Location line
- Height constraints
See if you can produce:
- Exposed slabs
- Flush facades
- Recessed glass conditions
All driven parametrically.
Also, can you use sorting to add the roof into slab list?
Wrapping Up
In this module, we:
- Cleaned slab boundaries into Revit-friendly lines + arcs
- Rebuilt slabs via region unions
- Drove system-family curtain walls from Grasshopper
- Introduced best practices for planarity, list management, and tracking
Next up: Adaptive families for twisting facades.
