Leveraging Object Attributes
Up to this point, we’ve:
- Set up our Rhino model with good construction geometry
- Established zoning and program targets
- Extracted key numerical and geometric data from our model
Now we’re ready to begin establishing an underlying structural grid that will carry through to Revit. But before we dive directly into slabs, columns and beams, we need to talk about a critical concept: object attributes. This will give us a way to transfer information cleanly between different Grasshopper definitions, while keeping our data lightweight and manageable.
Why Break Definitions into Parts?
In the last few sections, we built a fairly large Grasshopper definition to handle:
- Massing
- Zoning compliance
- Program tracking
- Area calculations
We could keep stringing everything together in one giant script, but that quickly becomes slow and difficult to manage. A better approach is to treat each stage as its own function or even as its own definition:
- One script for analysis and massing
- A new, clean script for building structural systems
This modular approach makes it easier to debug, reuse, and pass files between team members.
But in order to break things apart, we need a way to carry and organize data outside of Grasshopper. That’s where attributes come in.
Two Ways to Manage Data
There are two main strategies for managing complex data in Grasshopper:
- Data Trees – powerful, but can become very difficult to manage in large projects
- Object Attributes – lightweight, stored directly on the geometry, and transferable between definitions
We’re going to focus on Object Attributes, using the plug-in Elefront. Note - don't install from Food4Rhino - see install instructions later in this section.
Joe’s Tip #12
Don’t think of this as an either/or decision. In real projects, I use both Data Trees and Attributes. Learn them both, and use each where it makes the most sense.
What is Elefront?
Elefront was originally developed by the façade consultants at Front Inc. They needed a way to manage thousands of façade panels with different properties (curvature, type, material, etc.), and quickly realized that relying only on Data Trees was not scalable. Their solution: extend Rhino’s native object attribute system into Grasshopper.
-
Attributes are essentially custom key–value pairs you can attach to geometry
- Example:
Program = Retail - Example:
Height = 14'-0"
- Example:
-
Once attached, these attributes stay with the object in Rhino (after baking) and can be queried later—whether in a new Grasshopper file or when exporting to Revit.
Rhino 8 has implemented some of this functionality natively, but I still recommend Elefront:
- Easier to understand
- More powerful in some workflows
- Free and actively used in practice
- Better documentation
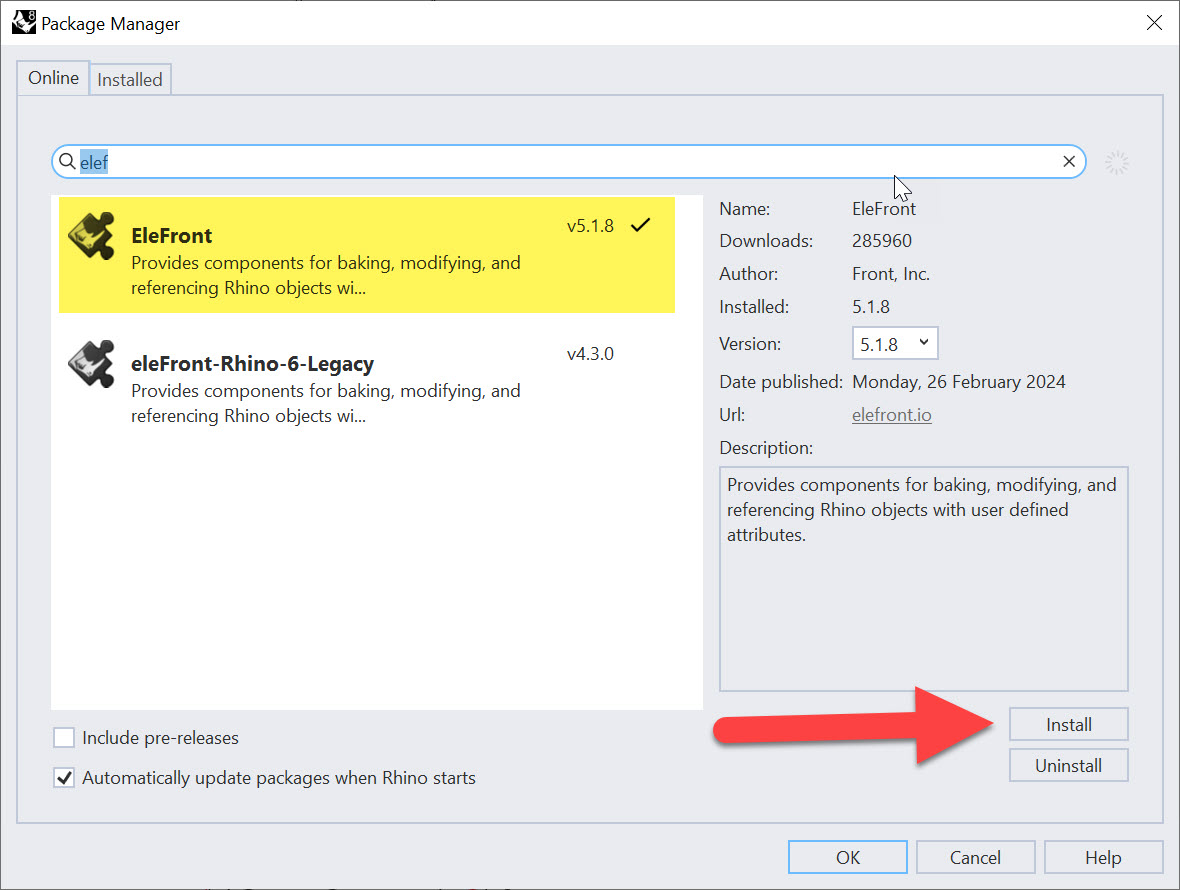
Installing Elefront
- In Rhino, run the command
PackageManager: - Search for Elefront.
- You’ll see two options:
ElefrontandElefront (Rhino6 Legacy). - Choose Elefront (only use the legacy version if you’re opening old definitions).
- Install, then restart Rhino.
Once installed, you’ll see a new Elefront tab in Grasshopper.
Setting Up Attributes on Floor Plates
We’re going to start by attributing our floor plate curves from the last module. These represent the boundaries of each slab, broken down by program type (Retail, Office, Hotel).
- Open your Grasshopper file from the last module.
- Locate the section curves that represent each floor plate. These are currently stored in a Data Tree with branches by program type.
- To simplify, add a
Shift Paths (PShift)component to clean up the structure.
At this point, you should have three sets of curves, one for each program.

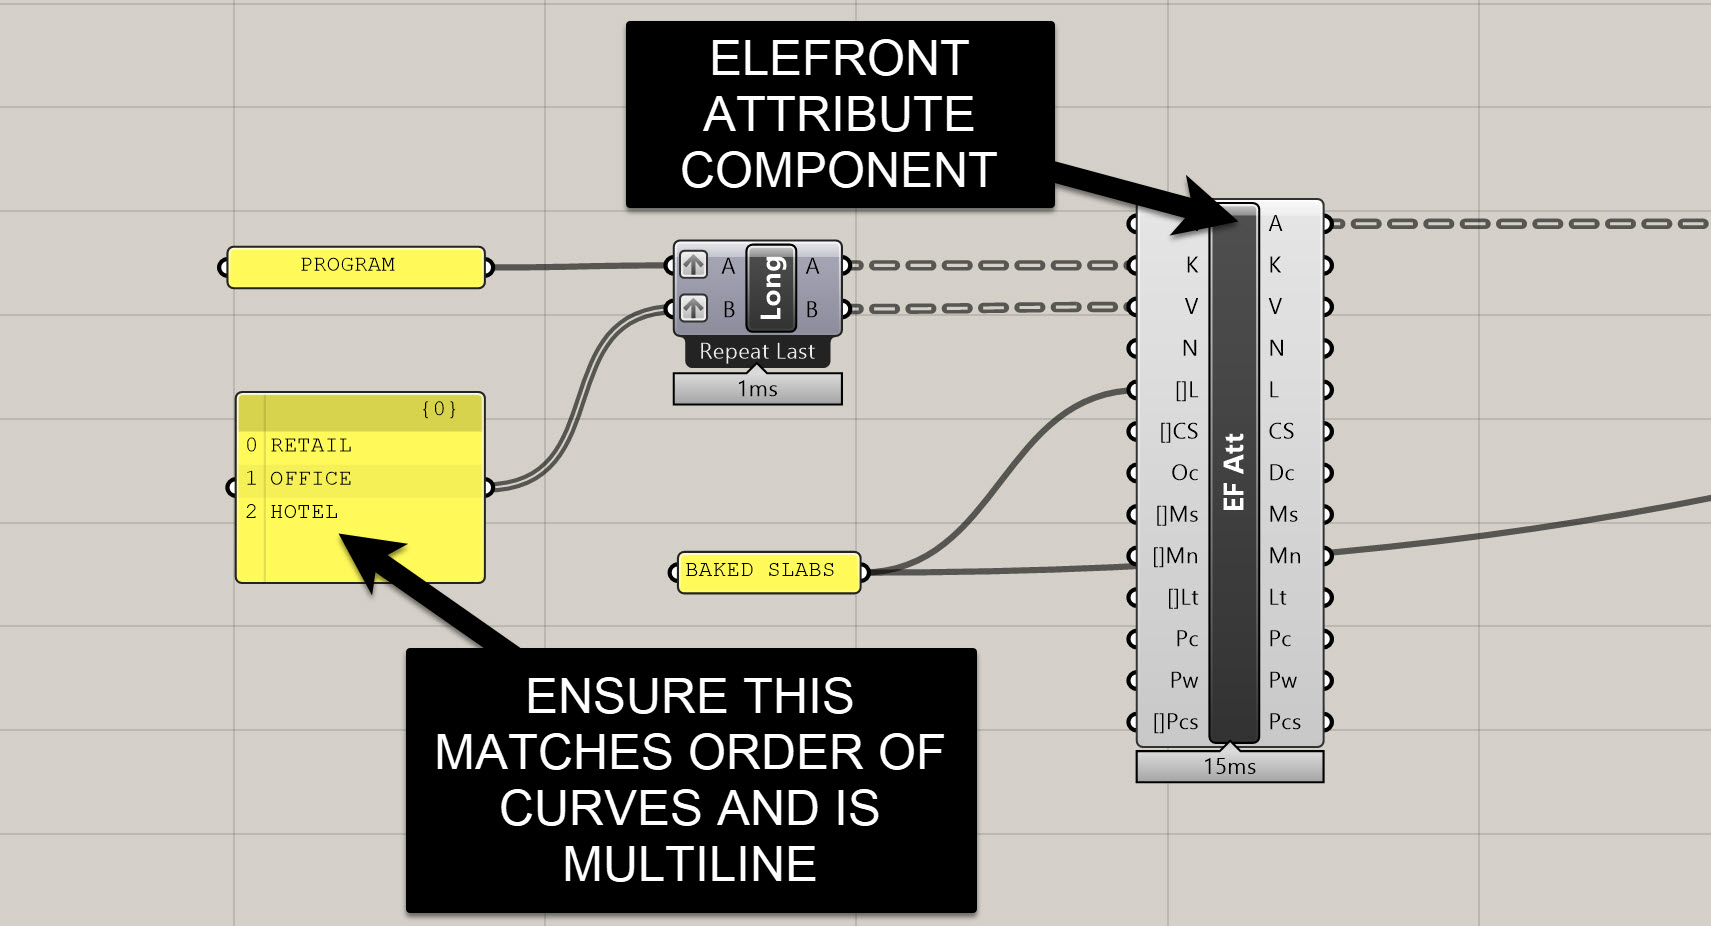
Adding Program Attributes
- Drop an
Elefront Attributescomponent onto the canvas. (It looks overwhelming, but don’t worry—we only need a few inputs.) - For the Key (K) input, create a
Panelwith the textProgram: - For the Value (V) input, create another
Panelwith the three program types listed on separate lines:
Retail,Office,Hotel. Right-click the panel and check Multiline Data so Grasshopper reads them as separate items.
4. Use a Longest List (Long) component to match up the keys and values so Elefront doesn’t throw an error.
Now every floor plate curve knows its program.
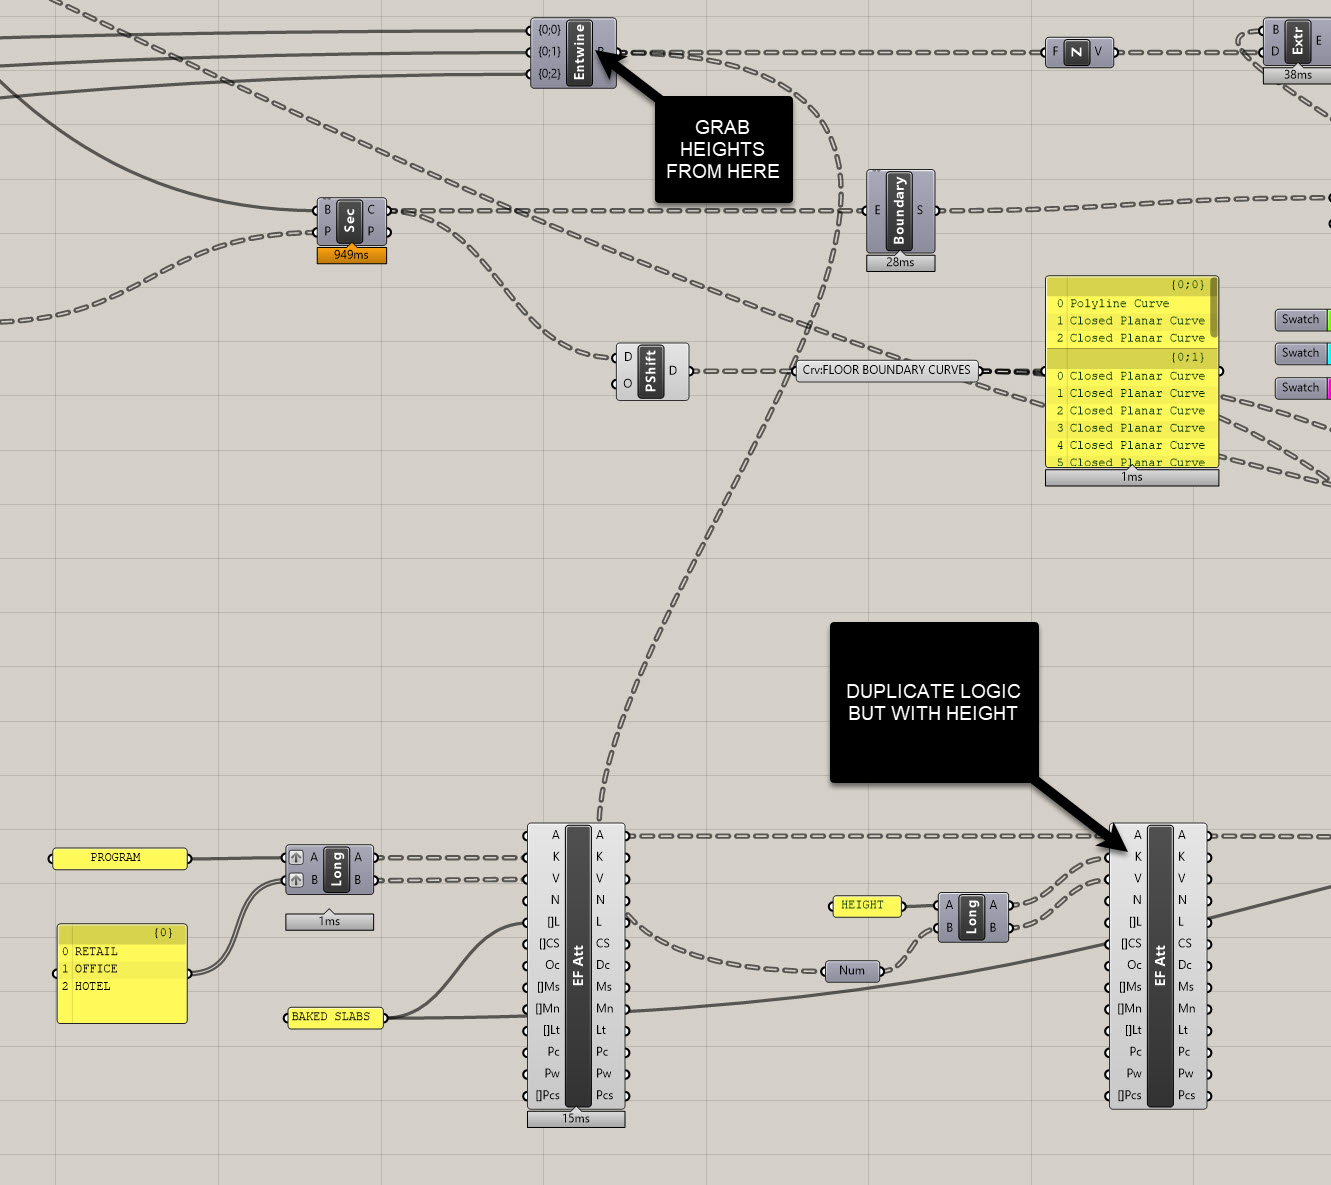
Adding Height Attributes
Next, let’s store the floor-to-floor height as an attribute.
- Create another
Elefront Attributescomponent. - Plug the output of the first Attributes component into the A input of the second—this carries the first set of attributes forward.
- For the new Key, create a panel with the text
Height: - For the Value, connect your floor-to-floor height numbers (from your stacking logic in the last module).
- Again, use a
Longest Listto keep everything aligned.
Now each curve knows both its Program and its Height.
Baking Attributed Geometry
Attributes are only useful if they stick to the geometry in Rhino. To do this:
- Drop an
Elefront Bake Objectscomponent. - Connect your boundary curves to the Geometry (G) input.
- Connect your attributed data to the Attributes (A) input.
- Create a
Panelthat saysBAKED SLABSand plug it into the Bake Name input.
- This ensures that re-baking deletes old geometry instead of duplicating.
- Use the same
Paneland plug it into the Layer input in your firstElefront Attributescomponent.
- This will send all baked geometry to a clean new layer layer.
Click Bake, and you’ll now see a Rhino layer called BAKED_SLABS.
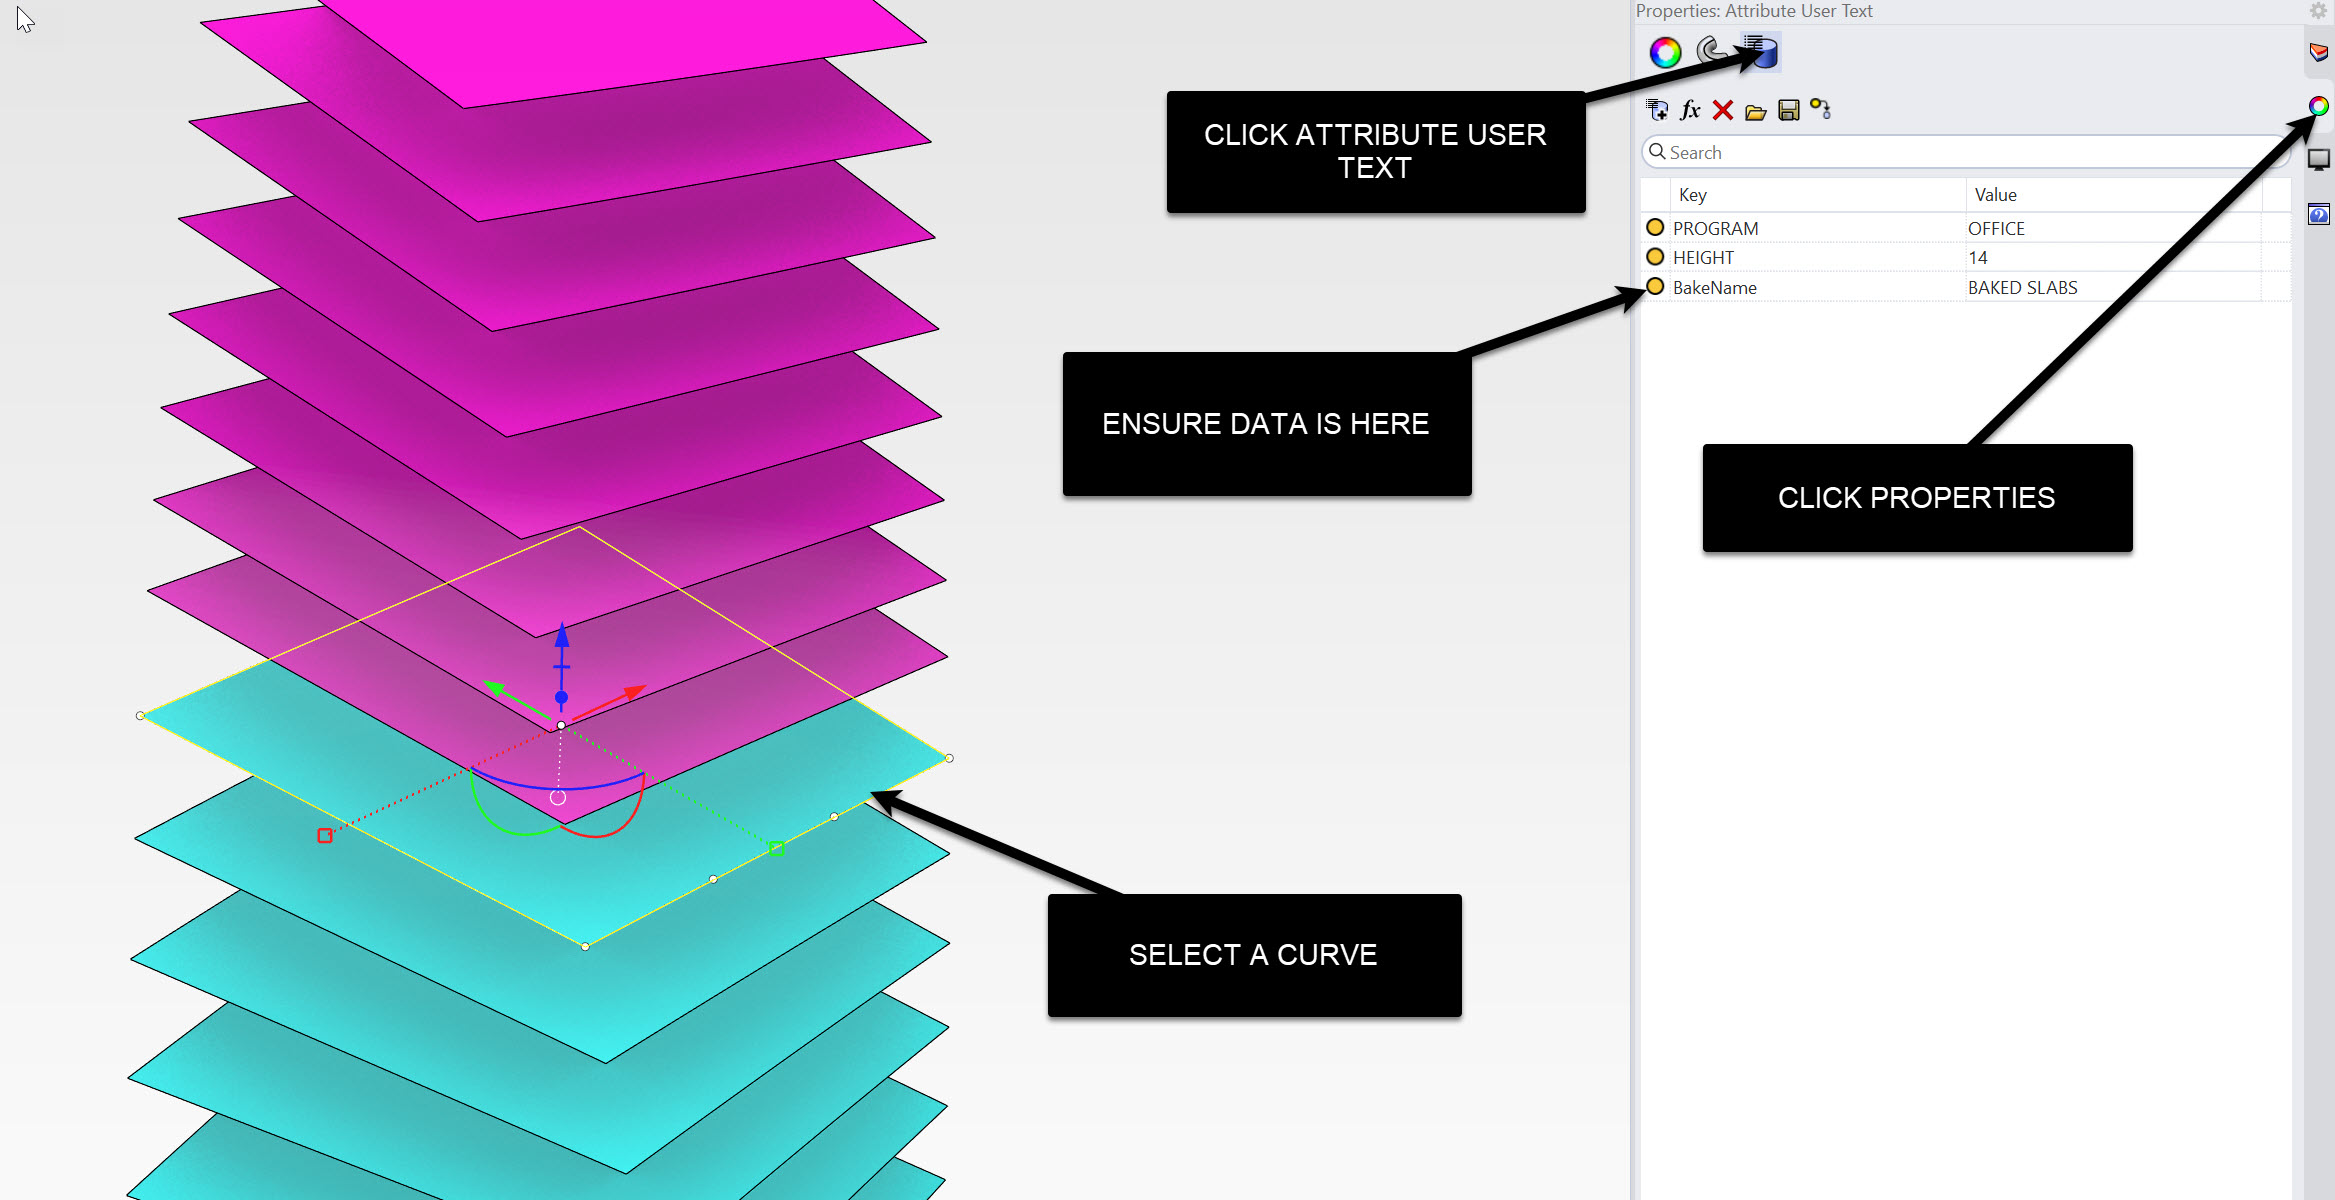
Check the Properties panel → User Text to confirm that each curve has its attributes.

At this point, you no longer need to keep the Grasshopper definition live—your curves are carrying the data themselves. To verify this, click on a curve in Rhino, then click on the Properties tab, and then click on the Attribute User Text button. You should see data associated with each curve. Click on a hotel, retail, and office curve to verify they have different data - if not, check you data organization in Grasshopper.
Joe’s Tip #13
This is the real power of attributing: you can safely close one definition, and later open a new one that picks up right where you left off. The geometry itself is now a carrier of structured information.
Side Challenge 8 Try extending this workflow by adding one more attribute:
- Area: Use the areas of each slab which we've already calculated and store it as an attribute.
- Hint: Use the areas from before, connect them to a
Longest List, and feed the values into another Elefront Attributes component.
If you can do this, you’ll now have geometry that stores Program, Height, and Area—ready for downstream use.
You can download the completed files here if needed:
Summary
In this section, we:
- Learned why it’s better to break Grasshopper definitions into smaller parts
- Introduced object attributes as an alternative to only using Data Trees
- Installed and set up Elefront
- Attached program and height attributes to our floor plate curves
- Baked them into Rhino with attributes intact
With these attributed slabs, we’re ready to move into the next step: establishing a structural slab in Rhino and Revit, using the attributes as a foundation for parametric coordination.
On to the next tutorial!
