Step 1: Setting up Github and Mapbox
Intro
Git + Github
To publish the web map you will create in this tutorial we will use GitHub. This website provides hosting for software development (a website is a kind of software...) version control using Git. Git is a system for tracking changes in software development, and was developed by Linus Torvalds, the same person who create of the Linux kernel. You can think of it like a very sophisticated version of Microsoft Word's track changes function, and in fact you can use it in this way for writing.
Note that Git and Github are not the same thing - Git is an open-source version control system, and Github is a for profit developer platform and software ecosystem built on top of Git, and owned by Microsoft. In this tutorial, your project will be stored and hosted on Github, and we will use Git to interface with Github. Note that for our purposes Github is a free service, but for more data intensive applications a pro membership is often required.
This tutorial will walk you through how to use Git with GitHub to track changes you make to your web map. However, it does not cover the mechanics of Git or GitHub.
Mapbox
Mapbox is a "location data platform" for mobile and web applications. Their service makes it easy to add maps to your projects and applications, and is built on data from Open Street Map. We will primiarly be interfacing with Mapbox via Mapbox Studio and Mapbox GL JS.
Similar to Github, while we will be using Mapbox in a completely free category for the purposes of these tutorials, it is a for profit company, and does have paid tiers that are necessary for large applications (like Accuweather and Strava, for example.) For an open-source alternative, I recommend CesiumJS, and may be re-making these tutorials for that platform soon.
Setup Prerequisites
Using GitHub will allow us to easily host our web maps online, however it requires a bit of set up.
At this stage, you should:
- create a GitHub account if you don't already have one
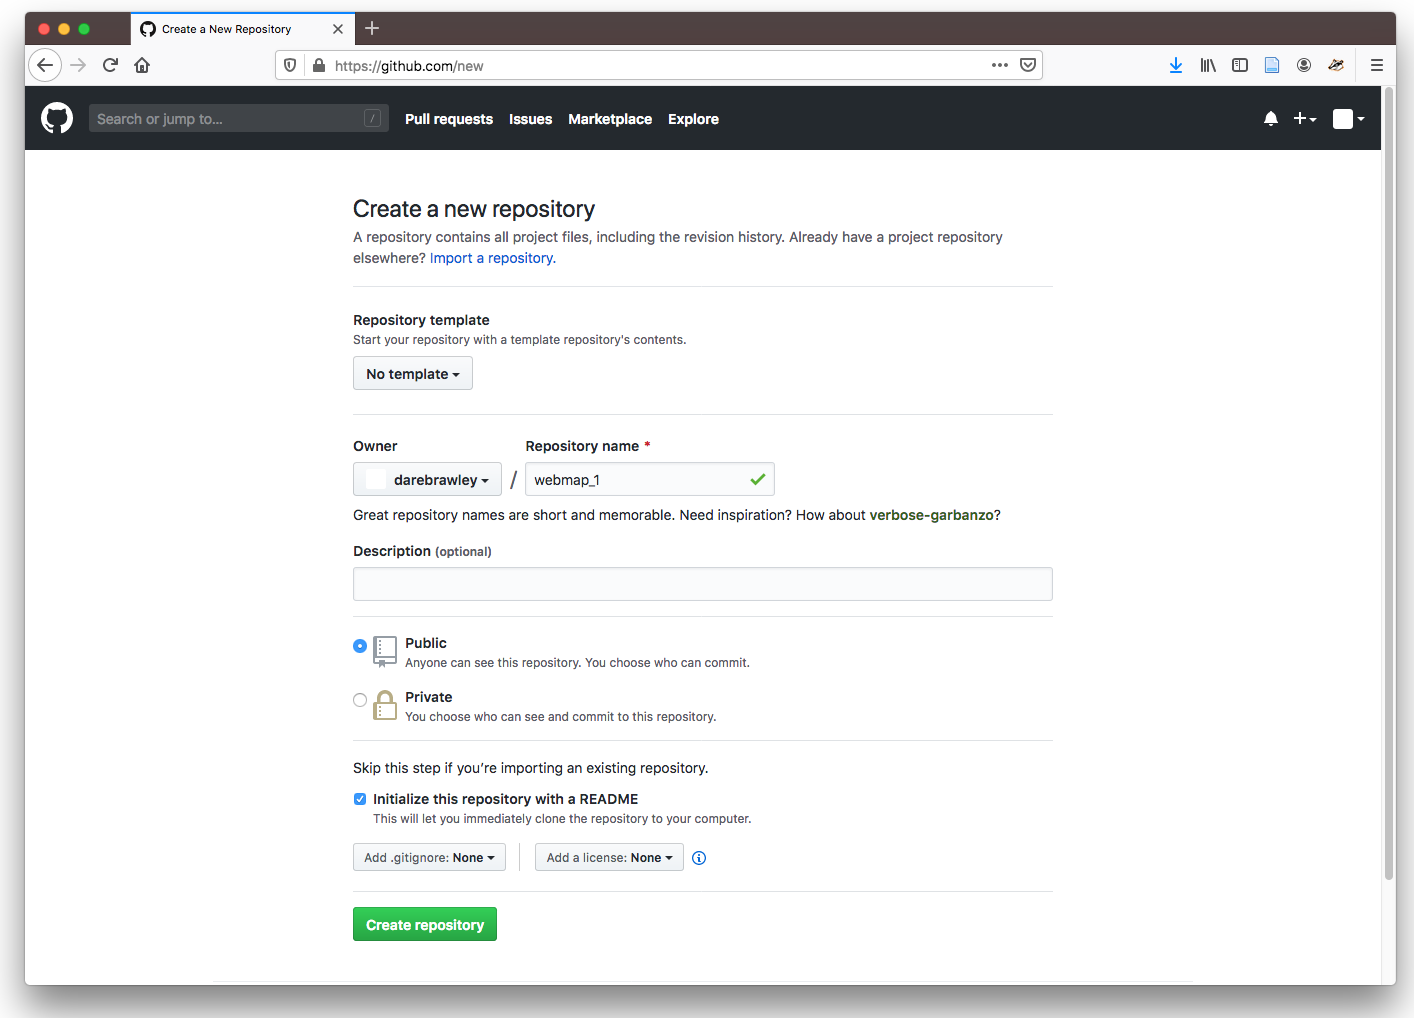
- create a new repository on GitHub
- from the Your Profile page in your newly created github account select Repositories
- select the green New button in the top right of the page
- name this repository
webmap_1 - select Initialize this repository with a README
- select Create Repository

- set up your repository as a GitHub page (a project site from scratch)
- from the new repository you've just created select Settings
- scroll down to GitHub Pages and select
Master Branchas the Source
-
install Git.
- download and install the git version for your operating system. Follow the instructions of the installer.
- Note that if you're using a Mac, this will just install the Git command-line program, which you can access through the Terminal app. On Windows, you'll get the command-line Git plus a new Terminal-like app called Git Bash.
-
use Git in the Terminal or Git Bash to clone the repository you created on github.
- On Mac open your terminal (Applications > Utilities > Terminal.app); on PC open Git Bash (Programs > Git > Git Bash, or search for it in the start menu).
- and learned how to navigate;
- navigate to the folder where you would like to create your web map.
- set up git, type the following in your terminal/git bash:
git config --global user.name 'Your Name'
git config --global user.email 'email@wherever.com'(this email should match the one you used to set up Github) - cloned a local copy of your repository to your computer using git.
- by typing:
git clone https://github.com/yourusername/webmap_1
- by typing:
Create empty files that will become your web map and commit your first changes, and push them to GitHub
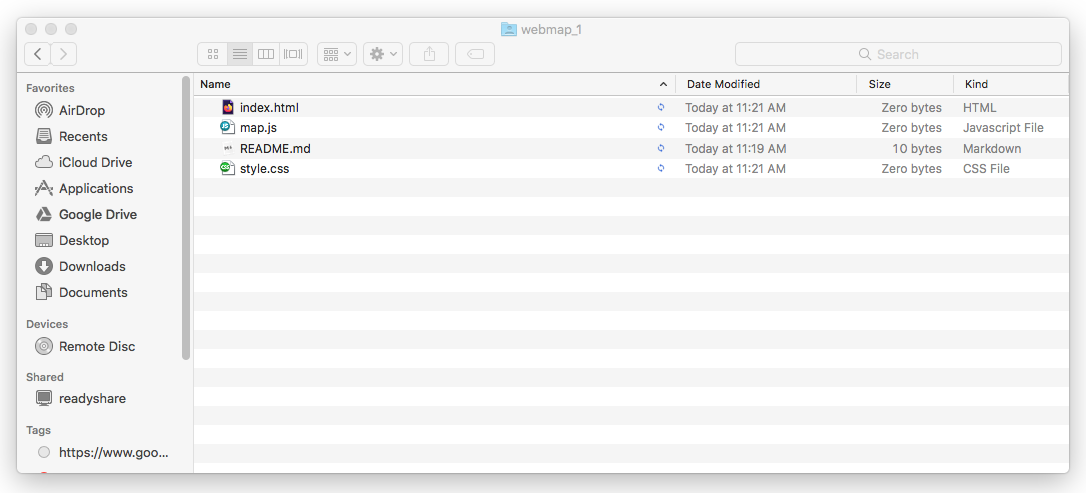
- open your text editor (VS Code is a good one) and create three empty files titled
index.html,style.css, andmap.js. Save them in yourwebmap_1folder. Yourwebmap_1folder should look like this:

- add the files you just created to your repository, to do this in your Terminal/Git Bash type:
git add index.html style.css map.js
- "commit" and "push" your changes:
- in Git Bash or Terminal type:
git commit -m 'initial import'
git push
- in Git Bash or Terminal type:
- view the result on your online github repository (the url should be
github.com/yourusername/webmap_1) github page (the url should beyourgithubusername.github.io/webmap_1but you can also find this in the settings of the repository you created on github). You should see something like this:

A web page
HTML is the structure of a web page, css is the style, and javascript is the functionality or the interaction. Each of these are contained in text files with the appropriate extension—and they each have entirely different syntax. When you are creating a website you are creating a series of linked files that your browser downloads and uses to construct the display. These files can also come from remote resources, such as in the case of javascript libraries or map tiles.

HTML is defined by a series of tags, which are either in the form <tag /> or <tag></tag>. A comment in HTML, which is simply a non-functional bit of text meant to explicate the code, is in the form <!-- comment -->. Reproduce the following in your index.html file using your text editor (you can copy and paste).
<!DOCTYPE html> <!-- let the browser know this is an HTML file -->

<html>      <!-- everything else is enclosed in html tags -->
<head>      <!-- the head is for metadata prior to building the page -->

    <!-- define the character set -->
    <meta charset='utf-8' />

    <!-- the title of the page which will show up in the browser bar -->
    <title>Map Test</title>

    <!-- discourage the browser from caching the page -->
    <meta http-equiv='Cache-Control' content='no-cache, no-store, must-revalidate' />
    <meta http-equiv='Pragma' content='no-cache' />
    <meta http-equiv='Expires' content='0' />

    <!-- tells mobile devices how to scale the page -->
    <meta name='viewport' content='initial-scale=1,maximum-scale=1,user-scalable=no' />

    <!-- stylesheet links -->
    <link href='https://api.tiles.mapbox.com/mapbox-gl-js/v0.50.0/mapbox-gl.css' rel='stylesheet' />
    <link href='style.css' rel='stylesheet' />

    <!-- javascript links -->
    <script src='https://api.tiles.mapbox.com/mapbox-gl-js/v0.50.0/mapbox-gl.js'></script>

</head>
<body>      <!-- visible structure of page begins here -->

    <!-- an element called 'map' -->
    <div id='map'></div>

    <!-- an element called 'info' -->
    <div id='info'></div>

    <!-- load additional javascript -->
    <script src='map.js'></script>

</body>
</html>
Notice that we are loading several files within this page (these are in the <link> and <script> tags). These include a css and javascript file from Mapbox, and our own css and javascript files. Some files need to be loaded in a particular order — the reason map.js is loaded within the body and not the head is that it must be loaded after the map and info elements have been created.
Likewise, put this into your style.css file:
body, html {
    margin: 0;
    padding: 0;
    font-family: monospace;
}

#map {
    position: absolute;
    top: 0;
    bottom: 0;
    width: 100%;
}

#info {
    position: absolute;
    top: 0;
    right: 0;
    margin: 10px 10px auto auto;    /* top right bottom left */
    padding: 5px;
    border: 2px solid #ddd;
    border-radius: 5px;
    font-size: 12px;
    text-align: center;
    color: #222;
    background: #fff;
}

img {
    width: 300px;
}
CSS, which stands for Cascading Style Sheets, defines the display properties for each HTML element — that is, how the page looks. At the moment, our page only has two elements, which you see defined here as #map and #info. We also have defined a default width for assets. Note that a comment in css is designated like /* comment */.
Next, copy the following text into your map.js:
console.log("Hello, world!")
Unlike HTML and css, javascript is a programming language. HTML and css give important information to the browser, but they are like blueprints, whereas javascript is more like a recipe. Javascript will be our focus for the web mapping exercises. We are going to stop short of covering all general programming fundamentals, but you will learn how the various elements function and how to modify code to suit your purposes.
console.log is a debug statement—it lets you write to the javascript console to keep track of what you're doing, which is a very helpful tool.
At this point, we will create a local webserver so that we can view the webpage we just created.
Create a local development server using Python:
on Mac:
- Open Terminal, then test to see what version of Python your computer has installed by typing
python -V. Hit enter. - note whether your computer has python 2 or python 3 installed
on Windows:
- Open Command Prompt, then test to see what version of Python your computer has installed by typing
python -V. Hit enter.
If python is installed on your computer it will tell you which version is installed. Make a note of whether it is Python 2 or python 3.
If your command prompt/terminal instead says something like 'python' is not recognized as an internal or external command, operable program or batch file. then you do not have Python installed and you will need to download it. Follow these instructions to download Python if it is not already installed.
Once you have successfully confirmed that you have python installed, we will use it to create a local server to view our website from.
Navigate to your webmap_1 folder from inside your Terminal or Command Prompt. To do this you will type cd followed by the path to your webmap folder. In my case this was:
$ cd Documents/webmap_1
Once you are inside your webmap_1 folder, type the appropriate command for your version of Python in Command Prompt or Terminal:
Python 3: python -m http.server
Python 2: python -m SimpleHTTPServer
After you hit enter your Terminal/Command Prompt should say something like: Serving HTTP on 0.0.0.0 port 8000 ...
Open your browser and navigate to: http://localhost:8000
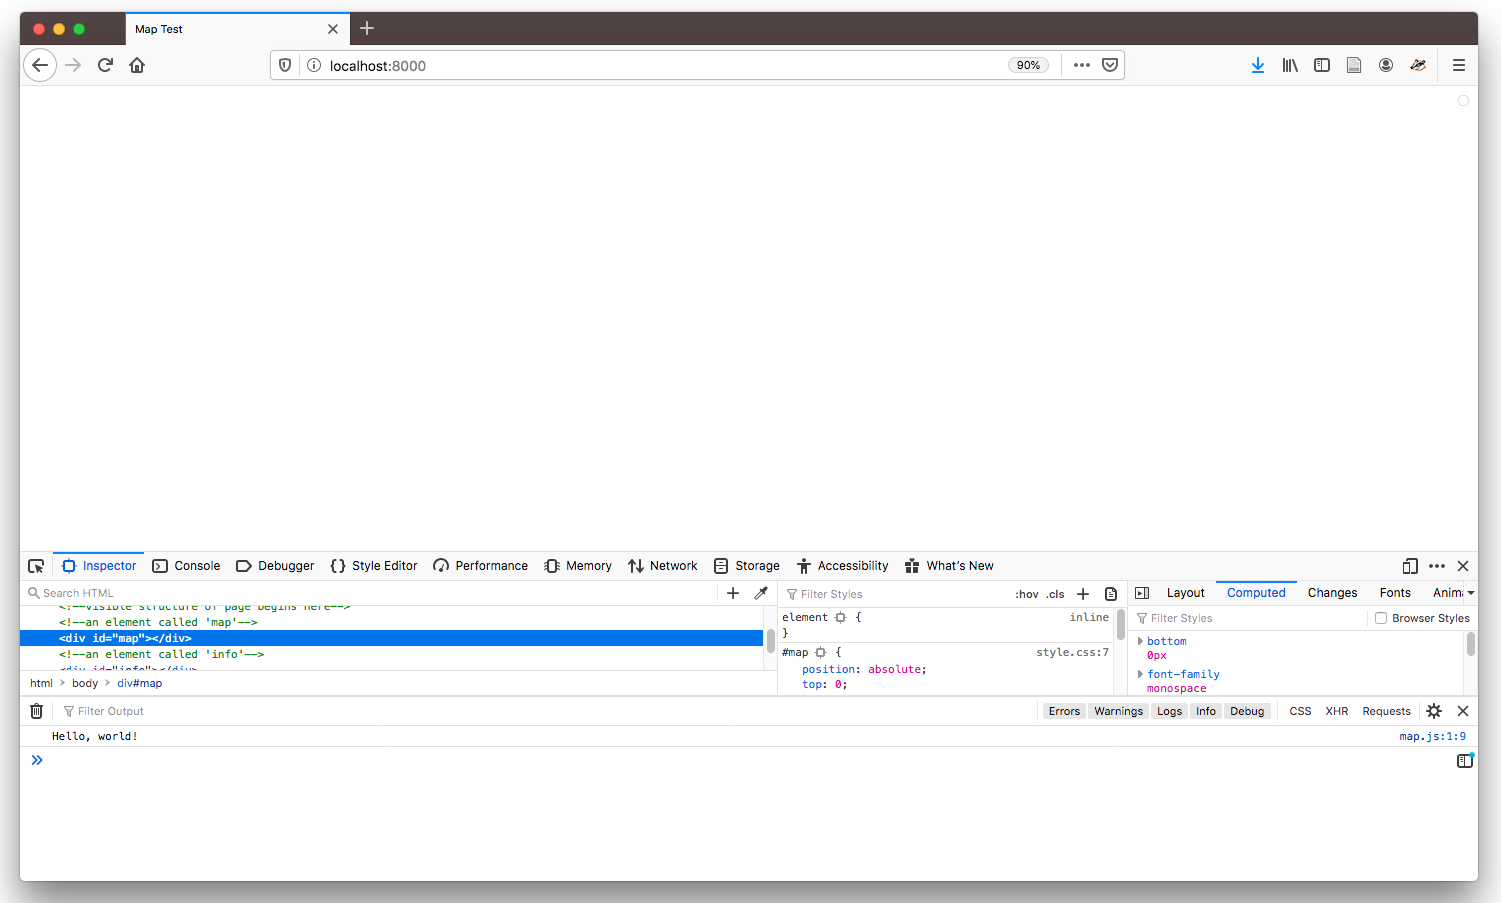
On the page itself you should see ... nothing.
However, in your browser open View > Developer > JavaScript Console . You should see "Hello, world!" printed. This means that your map.js file has been successfully loaded and you are ready to start programming. If you see any error messages, check the format of your HTML and that the script tag which loads the Mapbox javascript are formatted correctly.

Basic Mapbox GL JavaScript
One more setup step: register a Mapbox account. Then find your "Default public token" under the "Access Tokens" tab, which you will use in your code.
To begin, replace the debug statement in your map.js file with the following (minus the comments, which in js are designated by a leading //):
'use strict'        // let the browser know we're serious

// debug statement letting us know the file is loaded
console.log('Loaded map.js')

// your mapbox token
mapboxgl.accessToken = 'YOUR TOKEN HERE BETWEEN THE QUOTES'
You might want to reload your page and check the console to make sure there are no errors—you should just see your debug statement. Now add this to the bottom of your js file:
var map = new mapboxgl.Map({
    container: 'map',
    style: 'mapbox://styles/mapbox/light-v9',
    center: [-73.93324, 40.80877],
    zoom: 14
});
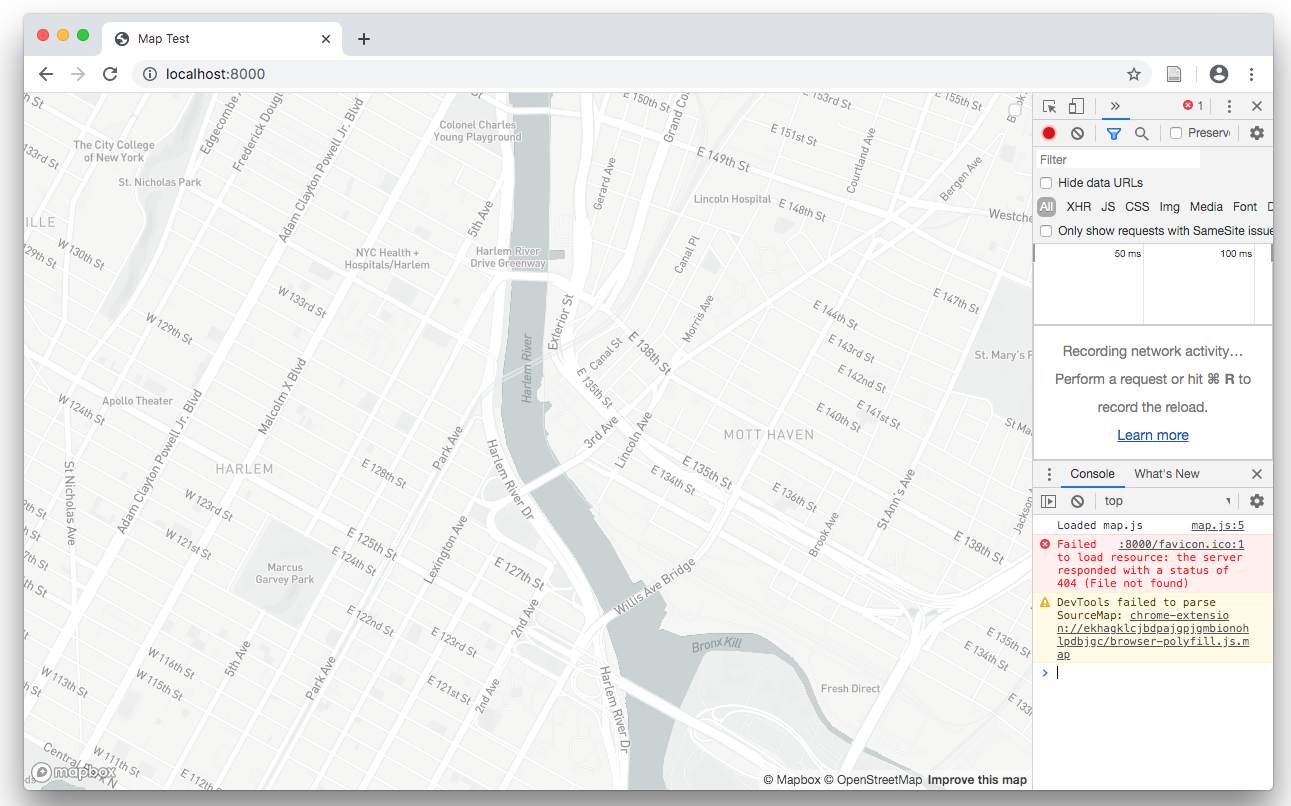
Now we're cooking with gas. If you reload, you should see a map of Harlem (Web Mercator Projection). Have some fun zooming around.

If you don't see a map, make sure you've followed the syntax exactly, and check for errors in your console. When programming, one misplaced character can break the whole thing (watch your commas and brackets!). The block of code we just added creates a new variable map which is a new instance of the Map object provided by the Mapbox javascript file we loaded in our HTML. "map" is actually an arbitrary name—you can choose whatever you want. A Map object has several attributes that we can change: container lets it know the HTML element that will become the map (in this case also called map), style defines a data source for the base map, and center and zoom define the starting coordinates for the map. Change these for map and see what happens.
Other options for style:
style: 'mapbox://styles/mapbox/basic-v9',
style: 'mapbox://styles/mapbox/outdoors-v10',
style: 'mapbox://styles/mapbox/light-v9',
style: 'mapbox://styles/mapbox/dark-v9',
style: 'mapbox://styles/mapbox/satellite-v9',
style: 'mapbox://styles/mapbox/satellite-streets-v10',
style: 'mapbox://styles/mapbox/navigation-preview-day-v2',
style: 'mapbox://styles/mapbox/navigation-preview-night-v2',
style: 'mapbox://styles/mapbox/navigation-guidance-day-v2',
style: 'mapbox://styles/mapbox/navigation-guidance-night-v2',
style: 'mapbox://styles/brianhouse/cjn0u552b52kr2spdz6yhpqj4'
Notice how the last style here is attached to a user account. You can customize your own styles with Mapbox Studio. Once you create a style, you'll just need to find your "Style URL" by clicking "Share & use" and then the "Use" tab and scrolling down.
There are many other attributes you can add to the Map object, which you can find here.

